Water Marbling Nail Art-How to do Marble Nails, without Water, Stone, Designs & Tips
Ever seen those cute and beautiful marbling patterns that remind you of candy and swirly fun themes? In this piece, learn how to do water marble nails step by step even for beginners ,dry marble without water , stone marble tutorial, white and black, as well as some DIY design ideas and tips to achieve the best results and a professional looking result at home. In addition, find tutorials for Halloween, Christmas plus epic fails
What is Marbling Nail Art?
Marbling Nail Art basically refers to designs of two or more color themes that are swirly and give a similar effect to that of a fancy marble or candy achieved with water and some basic nail art tools.Marbling designs are extra bright and colorful and great for Spring and Summer season.
How to do Marble Nails-Water Marbling Nail Art Tutorial For Beginners- Step by Step + Tips
Water marbling may look a bit tricky for beginners but actually, it is easy with a bit of practice and you don’t have to have any fancy equipment or tools to get such effect to your nails. The only downside of this method is that you’ll have to repeat the same process for each nail as water ambling designs look best over all nails and not just one in specific, like some forms of nail art.
Materials
The basic tools/material you will need include:
- 1 glass of water or any other container e.g a small bowl filled with water
- 1 toothpick
- At least 2 bottles of nail polish of different color each
- 1 white nail polish
- A base coat (optionally)
- A top coat
- A cotton swab
- Tissues
- Some sticky tape
- Nail Polish remover
Instructions
Step 1: Trim and file your nails to your desired length and shape. Make sure that the length appears even for all your nails as marbling will exaggerate any differences in length.
Step 2: Apply optionally the base coat to your nails to protect them and give them a good base for the next layers of nail polish that are going to be applied. Let it dry completely.
Step 3: Apply 1-2 coats of white nail polish. White nail polish is used in this case as blank canvas that makes colors pop up and show more opaque. Let it dry and fix any mistakes with a cotton swab dipped in acetone free remover.
Step 4: Wrap a sticky tape around your nails to prevent any spilling and make the process of removing excess nail polish much easier. Cut the tape into small pieces of ½ inch each and wrap around your nails.
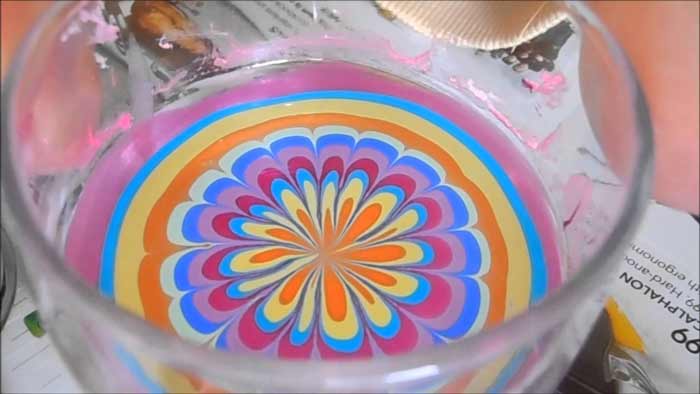
Step 5:Add the first nail polish to the water glass/container at a ½ inch distance from the water surface and holding the brush downwards so it drops easily. Aim preferably for the center of the water’s surface so you can add more colors later.
Step 6: Add the second color of nail polish using the same technique as above and aim for the center of the first nail polish this time.
Step 7: Take a toothpick and carefully stir around the circle of the floating nail polish pattern, without actually touching the nail polish circle. This is to expand the circle and make it easier to transfer on the nails.
Step 8: Using the same toothpick, begin dragging it inwards towards the third and fourth ring in a quick dragging motion that starts from the outer edge of the circle and goes through the core ring,
Step 9: Place your fingernail into the water and the core of the design at a 45 degree angle.
Step 10: Take the toothpick to grab the unused design over the water and take off your nail from the water, making sure that it doesn’t smudge.
Step 11: Let it dry and carefully remove the sticking tape so it only gets rids of excess nail varnish around the nails and not anything over your nails.
Step 12: Once the nail polish is dry, add an an extra layer of topcoat (preferably a shiny finish) and let it dry.
Step 13: Repeat the same steps on all other nails.
Ideas & tips:
- It’s possible to skip white nail polish but it gives a better color payoff and makes everything look more bright and opaque as opposed to transparent. A nude opaque nail polish will also do a similar job.
- Add more than two colors in the core of the circle for a more impressive multi-color effect. The only thing to keep in mind is that, if you are using more than two colors, the ring will be larger and you will need to use a container with plenty of space for the circle to spread and expand e.g a small bowl instead of an ordinary glass.
- Don’t expect to get the same effect on each of your nails as the circle will vary–the colors will be the same of course so no need to worry, the result will still look great and harmonious.
- Use a quality nail polish that offers an opaque finish for best results. If the nail polish is semi-clear or low quality the pattern may transfer to your nails but the result might not be so clear and bright. A thick nail polish works best in this case as it will be watered down during placement in water.
- The toothpick needs to always be used from the outer edge of the circle to inwards, not the other way round otherwise the pattern will simply mess up. However, you can still experiment with your toothpick again from outwards to inwards and slightly smudge it towards multiple direction to produce a more varied and vivid effect.
Striped rainbow water marble nail art tutorial
Water Marble Nail Art Without Water-Dry Marble
While water marbling nail art calls for the use of water to get a great and clear marbling effect it’s possible to achieve a similar marbling effect without the use of water. Do others call it dry marble nail art? This is also a good alternative if you don’t have much time to dip them into water and wait. Here is the basic process:
Step 1: Paint your nails with one or two coats of a white opaque nail polish. Make sure that the application is even and there are no blank spots but it’s not too thick either. Let it dry.
Step 2: Apply a second bright color in a couple of small dots/blobs dropped directly from your nail polish to your whitely painted nails at a ½ inch thick distance. While the dots are still wet, add the third color again in small dots anywhere on top of your nails.
Step 3: Take a toothpick or a thin wooden stick and swirl the dots and slightly blend with each other in two or more directions to achieve that swirl marble effect.The two (or more colors) will of course have to show through separately but they should look blended together nicely as well. On average, 5-7 small swirls are enough to get this effect.
Step 4: Repeat the same steps to your other nails as well making sure you use the same colors in each and everyone of your nails as the pattern will differ from one nail to another since you are making this yourself.
Here are two videos demonstrating how to do dry marble nail art:
video 1
video 2-easy dry marble at home
Stone Marble Nails Tutorial & Black
To get a stone marble art on your nails you will need a base coat, plastic wrap, polish of your favorite color, painting brush and a top coat. Here are steps to get stone marble.
- Apply one coat of Natural Base Coat to each nail.
- Wrinkle and wrap a piece of plastic wrap around your index finger.
- Use plastic-wrapped finger to lightly dab My Gondola Or Yours? onto each nail. My Gondola Or Yours is a luscious black polish by OPI
- With a thin nail art brush, draw on marble veins using the luscious black nail paint and let dry.
- Apply one thin coat of I Cannoli Wear OPI on top of the marbled lines.
- Apply OPI Top Coat and while still wet, paint more veins on marbled nails.
- Finish with OPI Top Coat.
Here a video tutorial, Courtesy of OPI
Water Marbling Nail Art Color Combinations-Black and White, Pink & Green Etc.
The color combinations for water marbling nail art are virtually endless as long as you use an opaque colored formula and preferably bright colors that work well with each other. Some popular color combos (at least two shades) you can try out are:
Black and White marble nails Tutorial
More other color combinations
- Pink and green
- Blue and yellow (and red)
- Green outer ring, orange middle color, and pink core ring
- Light Blue and red (for a candy like finish)
- Purple, mint or teal green, and pastel pink
- Navy Blue and Purple
- Orange, yellow, and teal blue
- Dark blue and gray
- All rainbow colors
Water Marble Nail Art Designs
Apart from the above color combos, you can also go for designs that add a twist to your marble nail part. For example:
- Small black dots applied to the centre of the wring or rhinestones for a more glamorous finish.
- Semi-clear glitter lines like gold, silver, or pink (or any other contrasting color) applied over the lines of the swirls.
- Swirls that are arranged in a way that resembles a spider web
- Swirls that go in all sorts of directions, left to right and top to bottom
- Swirls that only cover one side of the nail
- Swirls that cover only the tips of your nails for a marble french manicure
- Neon color swirls (ideal for summer)
You can also experiment with Water Marbling Nail Art Games online to see different color combos and designs before you choose the one that works best for you.
There are many combos and designs to sport but perhaps the less ideal design and combo would be to add multiple designs and colors to each of your nail that differs from the rest of your nails because the result will simply look too much.
Videos of Water Marble Nail Art Halloween & Christmas
How to do an easy halloween pumpkin water marble nail art
Here is a video tutorial of water marbling nail art for October 31
Christmas video tutorial
If you want some marble nail art during Christmas here is video tutorial.
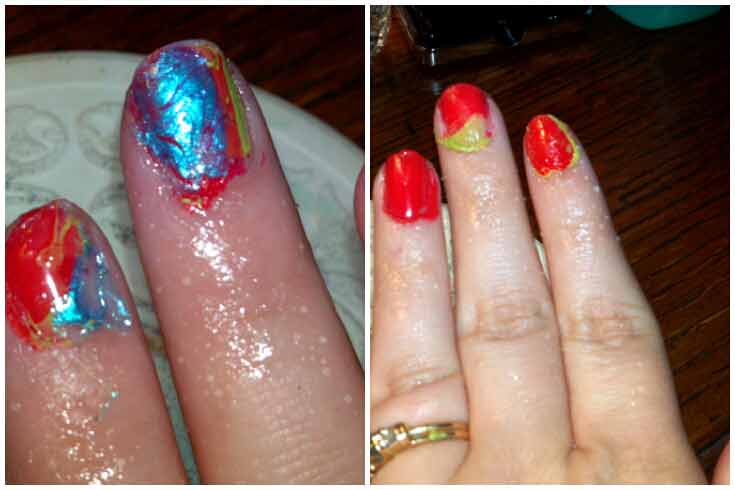
Water Marble Nail Art Gone Wrong-Fails
Sometimes things just go wrong! This is especially if you are a beginner doing water marbling nail art for the first time.
Here are images and and a video compilation.
Gallery of water marble nail art gone wrong

Video compilation-water marble fails
How not to do Water Marbling Nail Art-Tips
Originally posted 2020-12-29 02:44:16.