Nail Polish Strips – Apply, Remove, Dry, Adhesive, Stick-On Best Reviews
Nail polish strips are great when you have no time to wait for nails to dry after painting them. In this guide, find out the best brands of nail polish strips with real salon effects, how to make polish strips, how to apply and remove. Also covered are types such as polish strips for toes, stick on and adhesive fingernail polish strips.
- What is the best nail polish strip brand?
- How to apply nail polish strips?
- How do I remove fingernail polish strips without damaging my nails?
- What polish strips have the best reviews?
- How do I make my own fingernail polish strips?
If you are a fan of nail art and designs, then this is the best option for you especially if you do not have the time to sit and paint your nails and wait for them to dry. It gets even more difficult when you have to wait for some nail art to be drawn on your nails. With strips, doing nail art on your nails is fast, since the designs are already made and cut out, so you just apply and you are ready to go.
See below on how to apply nail strips and how to remove fingernail polish strips.
Types of Nail Polish Stickers
- Dry nail polish strips – ViVi Adhesive Dry Nail Polish Manicure Strips – Classic Black is one of the best brands of stick-on dry strips.
- Press on nail polish strips and adhesive nail strips are all stickers that have adhesive on them and are easily applied by laying them right on top of your nails.
- Halloween nail strips: If you want to do your nails for Halloween festivals and parties, you can choose to wear these strips as part of your costume. These can be an alternative option to choosing some Halloween nail polishes such as blood red or deep black nail polishes. Couple your Halloween nail strips with Halloween contact lenses and you are ready to go.
- Toenail polish strips: Nail strips for toes come in as many designs as stickers for fingernails, but of course they are suited for use on toenails only due to their special shape.
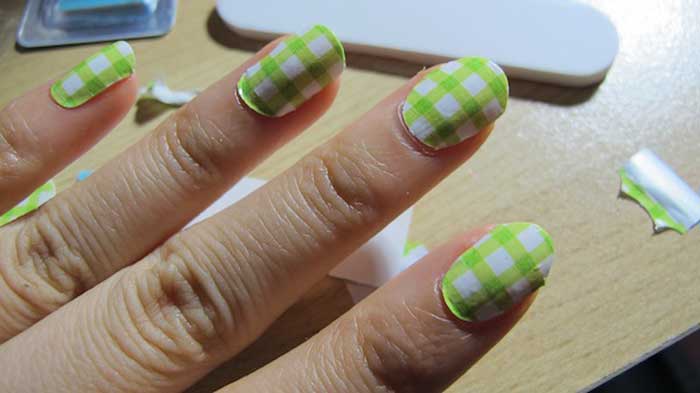
How to Apply Nail Polish Strips/How to Put On Nail Polish Stickers
Nail polish stickers come in varying sizes. Like contact lenses, there is nothing like “one size fits all”. You must learn how to put on nail polish stickers in order to avoid poorly done results. There are different types of stickers as seen above, with some of them difficult to apply. Here are simple steps on how to apply the strips on your nails, whether they are stick-on nail polish strips or adhesive nail polish strips.
- Always choose the small stickers that are close to your actual nail size. If you choose larger ones, you will end up with the strips peeling off and looking sloppy.
- Remove covers on both sides of the sticker to reveal the designs as well as the adhesive side.
- Carefully place the stickers on your fingernails to avoid bubbles forming beneath.
- Some girls apply a clear top coat on their nails after wearing the strips to make them last long.
That is it ladies on how to apply nail polish stickers. You may need to warm the strips in your palms so that they can be more pliable. If there is an excess, file it off carefully. Do not tear off the excess strips. If you do this carefully, you will be able to produce the salon effects real nail polish strips on your fingernails or toenails.
Best Nail Polish Strips/ Nail Polish Strip Brand Reviews
- Sally Hansen Salon Effects Real Nail Polish stickers; Sally Hansen Salon Effects Real Nails Polish Strips in Fly with Me
- Incoco Nail Polish Strips
- Kiss Nail Dress Strips in Princess
- Nailene Nail Polish Stickers
- OPI Nail Polish Strips: OPI For Sephora;
- Avon Nail Polish Strips
- imPRESS Press-On Manicure in Shout
- Camo Nail Strips
- Sally Hansen Real Nail Strips
- Sephora Nail Patch French Manicure
- NailWOW: Nail Polish Strips
How to Make Nail Polish Strips – Tutorial to Make Your Own Polish Strips
With simple DIY steps, you can make your own nail polish strips at home from real nail polish. Here, we will give an easy step-by-step tutorial. You will need the following to make your own designs of strips for your nails:
- Nail polish of any color you want, such as green polish, black varnish, pink polish or even white nail polish.
- A sandwich bag, made of plastic is better.
- A high-quality top coat.
DIY Steps for Making the Strips
- First, use your favorite nail polish color to paint strips on the plastic sandwich bag. You will need to shape them about the size of your nails’ width but slightly longer than the length of your nails. Ensure that you place the strips far apart to make it easier to cut them into individual pieces.
- If you want to do a design, go ahead and make a design. You can draw, or use any other mechanism such as blowing to create or make your designs on the strips.
- Allow the nail polish you applied on the strips to dry for a few hours.
- Cut the strips with the designs to make single pieces of strips ready to apply on your nails.
That’s it ladies, a simple tutorial on making your own homemade nail polish stickers.
How to Remove Nail Polish Strips
Now that you know how to make and wear the strips, how about removing them. You might need to have the best nail polish remover in order to remove these. The process might not be the same as that of removing gel nails.
To remove stickers, you will need to use regular nail polish removers. However, that is just what Sally Hansen recommends. It might not be what works perfectly. I found that the design might remain on the nails, or at least some parts of it when using regular polish removers. But removing nail polish stickers with pure acetone nail polish remover works perfectly for me.
Originally posted 2021-01-07 16:18:14.